let me be honest here, this post is mostly for my benefit. one day, i may want to cut my fabric on the bias again. & more than likely i'll have forgotten how. (what's cutting on the bias you ask? basically, instead of cutting your fabric in horizontal strips, you cut it on a 45 degree angle. it's great for strips, checks... makes them lay at an angle. still confused? check out THIS picture of my quilt. see the how the stripes on the binding lay at angle? that's because i cut the fabric on the bias.) and yes, before i get started, i realize there are lots of tutorials out, showing you how to cut on the bias. but all the ones i came across involved math & looked super confusing. although, the perk of using THIS how-to, is that when you are done cutting, your strips are already sewn together... but just looking at the diagrams gave me a headache. so, here's how i do it... (a big thanks to abby for teaching me how!) click on each picture to enlarge & show all the fine little details.
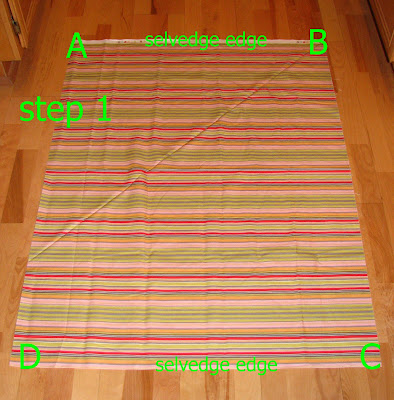
step one: lay out your fabric, similar to a piece of paper (i use the selvedge edges as my top and bottom). now mentally, or literally, which ever works for you... mark each corner. starting with the top left & going clockwise, mark the corners with A,B,C & D (as shown below.) step 2: fold corner A down diagonally, so that the top (selvedge) edge lines up with the side. when folded, corner A will be above corner C. (see picture below)
step 3: fold corner B down diagonally. you will basically be folding the crease created by step 2, in half. when folded, corner B will be above corner D, and your fabric will look like a little house: a triangle roof (we will call the tip of the roof or triangle: E) & a rectangle below. (see picture below)
step 4: fold corner B up to point E, once again, folding the crease in half. (see picture below) step five: carefully flip the fabric over. instead of seeing the right side of the fabric near corner C & the wrong side near corner D, you want to see the right side of the fabric near corner D & the wrong side of the fabric near corner C. you also want to make sure that corner D is pointing down, with the long horizontal edge at the top. (see picture below)
step six: this step isn't necessary, but i've found that if i fold the fabric in half, i can cut a strip with just one swish of my rotary. simply take corner C & fold it back over the fabric (to the left), making sure to keep the horizontal edges lined up. (see picture below)
step seven: line your ruler up with the horizontal edge & cut strips to your desired width. (see picture below) i prefer to cut them about 2.25" wide.
step eight: viola! bias cut fabric.
Tuesday, March 11, 2008
cutting on the bias.
Add Post To: | Kirtsy| Stumbleupon| Digg| Technorati| Twitter| del.icio.us| Reddit| BlinkList| Furl| Spurl| Yahoo| Simpy|
Subscribe to:
Post Comments (Atom)


7 comments:
Wow. This is why I don't sew. I have never understood what a bias is. But this actually kinda makes sense. Thanks for sharing!
You are an amazing person! I cannot imagine having time for sewing - maybe if I knew how, the story would be different!
This is another reason I love the old blogs. One of these days I'm going to need to do this.. and here are the perfect instructions. This one is a keeper! Great post!!!
Thanks that really helped me!
Great tutorial!
Thanks! This seems like it was a lot of work for you to post! Good job, I will definitely be glad to have this if I ever need it in the future!
Thank you for the quilt advice. I get to stew over it for another couple of months until school is done and then I will dive in full force. (It's better than trying on bathing suits. Ha!)
Post a Comment